FastAPI + Next.js + PG 풀스택 nfp-boilerplate 예제를 따라하며 정리해 봅니다.
처음 계획은 FastAPI 저자가 작성한 예제 tiangolo/full-stack-fastapi-postgresql 를 따라해 보려고 했었습니다. 그러나 패키지 설치 실패, Docker 생성 실패 등의 문제가 있어서 다음으로 미루고 다른 예제를 찾아서 공부하기로 했습니다.
1
2
3
4
5
6
7
8
9
| pip install cookiecutter
cookiecutter https://github.com/tiangolo/full-stack-fastapi-postgresql
# ==> 처음 project 이름만 아무거나 입력
cd { project-name }
docker-compose up -d
# ==> 실패!
|
0. 예제 소개
아래 모든 내용은 위 글을 기반으로 따라하며 정리하였습니다. (글쓴이에게 감사)
프로젝트 구성
- nfp-backend
- FastAPI
- sqlalchemy + psycopg2
- postgresql
- nfp-frontend
1
2
3
4
5
6
7
8
9
10
11
| #
$ git clone -b tutorial-1-how-to-build-nfp-boilerplate \
$GITHUB/travisluong/nfp-boilerplate
$ cd nfp-boilerplate
$ ls -lt
README.md
nfp-backend
nfp-frontend
|
1. nfp-backend
1) poetry 패키지 설정
1
2
3
4
5
6
7
8
9
10
11
12
13
14
15
16
17
18
19
20
21
22
23
24
25
26
27
28
29
30
| $ cd nfp-backend
$ poetry init
# ----------------------------
[tool.poetry]
name = "nfp-backend"
version = "0.1.0"
description = ""
authors = ["Min Byeong-Guk <maxmin93@gmail.com>"]
readme = "README.md"
packages = [{include = "nfp_backend"}]
[tool.poetry.dependencies]
python = "^3.9"
[build-system]
requires = ["poetry-core"]
build-backend = "poetry.core.masonry.api"
# ----------------------------
# create venv
$ poetry install
$ ls -lt .venv/bin/python
$ cat requirements.txt | xargs poetry add
# installed packages list with last version
$ poetry show -l
|
2) database 작업
create user, database, remote access
1
2
3
4
5
6
7
8
9
10
11
12
13
14
15
16
17
18
19
20
21
22
23
24
25
26
27
28
29
30
31
32
| $ ssh minubt
# createuser tonyne -P
$ createuser --interactive --pwprompt
Enter name of role to add: tonyne
Enter password for new role:
Enter it again:
Shall the new role be a superuser? (y/n) n
$ createdb -O tonyne nfp_boilerplate_dev
# SERVER: allow remote access from all
$ vi ~/Servers/agensgraph/pg_data/postgresql.conf
# ==> listen_addresses = '*'
# USER: allow remote access in local LAN with password
$ vi ~/Servers/agensgraph/pg_data/pg_hba.conf
# ==> host all tonyne 192.168.0.0/24 md5
$ sudo service postgresql restart
$ sudo service postgresql status
$ exit
$ psql -h minubt -U tonyne -d nfp_boilerplate_dev -W
# ==> databases list: \l
# ==> tables list: \dt
# ==> users list: \du
# ==> quit: \q
# test
> create table temp(id int primary key, name varchar(100));
|
참고: 나중에 user 소유로 데이터베이스를 변경하고 싶을 때
1
2
3
4
5
6
7
8
9
10
11
12
13
14
15
16
17
| -- change owner of database
alter database nfp_boilerplate_dev owner to tonyne;
-- users: role_name, role_attr
SELECT usename AS role_name,
CASE
WHEN usesuper AND usecreatedb THEN
CAST('superuser, create database' AS pg_catalog.text)
WHEN usesuper THEN
CAST('superuser' AS pg_catalog.text)
WHEN usecreatedb THEN
CAST('create database' AS pg_catalog.text)
ELSE
CAST('' AS pg_catalog.text)
END role_attributes
FROM pg_catalog.pg_user
ORDER BY role_name desc;
|
alembic migration
1
2
3
4
5
6
7
8
9
10
11
12
13
14
15
16
17
18
19
20
21
22
23
24
25
26
27
28
29
30
31
32
33
34
35
36
37
38
39
40
41
42
43
44
45
46
47
48
49
50
51
52
53
54
55
56
57
58
59
60
61
62
63
64
65
66
67
68
69
70
71
72
73
74
75
76
77
78
79
80
81
| $ poetry shell
# create init file
$ alembic init alembic # already done
$ vi alembic.ini
# ==> sqlalchemy.url = postgresql://tonyne:tonyne@minubt/nfp_boilerplate_dev
$ alembic revision -m "create notes table"
$ ls -lt alembic/versions
7ff3d09ed552_create_notes_table.py
$ vi alembic/versions/7ff3d09ed552_create_notes_table.py
# -------------------------------
def upgrade():
op.create_table(
"notes",
sa.Column("id", sa.Integer, primary_key=True),
sa.Column("text", sa.String),
sa.Column("completed", sa.Boolean)
)
def downgrade():
op.drop_table("notes")
# -------------------------------
# dry-run : check sql
$ alembic upgrade head --sql
# -------------------------------
INFO [alembic.runtime.migration] Context impl PostgresqlImpl.
INFO [alembic.runtime.migration] Generating static SQL
INFO [alembic.runtime.migration] Will assume transactional DDL.
BEGIN;
CREATE TABLE alembic_version (
version_num VARCHAR(32) NOT NULL,
CONSTRAINT alembic_version_pkc PRIMARY KEY (version_num)
);
INFO [alembic.runtime.migration] Running upgrade -> 127bcea40bef, create notes table
-- Running upgrade -> 127bcea40bef
CREATE TABLE notes (
id SERIAL NOT NULL,
text VARCHAR,
completed BOOLEAN,
PRIMARY KEY (id)
);
INSERT INTO alembic_version (version_num) VALUES ('127bcea40bef') RETURNING alembic_version.version_num;
COMMIT;
# -------------------------------
# real migration
$ alembic upgrade head
INFO [alembic.runtime.migration] Context impl PostgresqlImpl.
INFO [alembic.runtime.migration] Will assume transactional DDL.
INFO [alembic.runtime.migration] Running upgrade -> 127bcea40bef, create notes table
# check database
$ psql -h minubt -U tonyne -d nfp_boilerplate_dev -W
# list only-tables: \dt (시퀀스까지 모두 출력: \d)
nfp_boilerplate_dev=> \d
List of relations
Schema | Name | Type | Owner
--------+-----------------+----------+--------
public | alembic_version | table | tonyne
public | notes | table | tonyne
public | notes_id_seq | sequence | tonyne
public | temp | table | tonyne
(4 rows)
# (바로 이전) 버전 다운
$ alembic downgrade -1
# (바로 다음) 버전 업
$ alembic upgrade +1
$ exit # from poetry shell
|
3) fastapi 작업
1
2
3
4
5
6
7
8
9
10
11
| $ pwd
{PROJECT-ROOT}/nfp-backend
# create .env
$ cat <<EOF > .env
DATABASE_URL="postgresql://tonyne:tonyne@minubt/nfp_boilerplate_dev"
>EOF
# execution with .venv
$ poetry run uvicorn main:app --reload
|
API 확인
1
2
3
4
5
6
7
8
9
10
11
| $ curl -X GET "http://localhost:8000/notes/"
[]%
$ curl -d '{"text":"nfp-backend tutorial", "completed":"true"}' \
-H "Content-Type: application/json" \
-X POST "http://localhost:8000/notes/"
{"id":1,"text":"nfp-backend tutorial","completed":true}%
$ curl -X GET "http://localhost:8000/notes/"
[{"id":1,"text":"nfp-backend tutorial","completed":true}]%
|
2. nfp-frontend
React.js 의 SSR 프레임워크 (정적페이지 & 서버렌더링)
Next.js 설치
1
2
3
4
5
6
7
8
9
10
11
| $ node --version
v16.17.0
$ npx --version
8.19.1
$ yarn --version
1.22.19
$ npx create-next-app --version
12.3.0
|
주의!! npx create-next-app --example 생성물과 github examples 이 다르다.
github 의 전체 examples 에서 직접 다운로드 하는 것이 올바르다!
create-next-app 의 템플릿 –typescript (–ts) 는 올바르게 나옴.
1
2
3
4
5
6
7
8
9
10
11
12
13
14
15
16
17
18
19
20
| $ npx create-next-app ts-starter --ts
# dependencies
- react
- react-dom
- next
# dev-dependencies
- eslint
- eslint-config-next
- typescript
- @types/node
- @types/react
- @types/react-dom
$ cd ts-starter
$ yarn dev
ready - started server on 0.0.0.0:3000, url: http://localhost:3000
|
1
2
3
4
5
6
7
8
9
10
11
12
13
14
15
16
17
18
19
20
21
22
23
24
25
26
27
| $ yarn add -D tailwindcss postcss autoprefixer
$ npx tailwindcss init -p
# config 파일 2개 생성 (수정 사항 없음)
Created Tailwind CSS config file: tailwind.config.js
Created PostCSS config file: postcss.config.js
$ vi pages/_app.tsx
# 맨 위에 추가
# -------------------------------
import 'tailwindcss/tailwind.css'
# -------------------------------
$ vi styles/globals.css
# 맨 위에 추가
# -------------------------------
@tailwind base;
@tailwind components;
@tailwind utilities;
# -------------------------------
$ yarn dev
ready - started server on 0.0.0.0:3000, url: http://localhost:3000
|
2) notes 페이지 추가
npx create-next-app nfp-frontend 생성tailwindcss 적용pages/notes.js 파일 생성 후, 아래 작성yarn dev 확인
1
2
3
4
5
6
7
8
9
10
11
12
13
14
15
16
17
18
19
20
21
22
23
24
25
26
27
28
29
30
31
32
33
34
35
36
37
38
39
40
41
42
43
44
45
46
47
48
49
50
51
52
53
54
55
56
57
58
59
60
61
62
63
64
65
66
67
| import Head from 'next/head'
import { useState, useEffect } from 'react';
export default function Notes() {
const [note, setNote] = useState('');
const [notes, setNotes] = useState([]);
useEffect(() => {
async function fetchNotes() {
const res = await fetch(`${process.env.NEXT_PUBLIC_API_URL}/notes/`);
const json = await res.json();
console.log(json)
setNotes(json);
}
fetchNotes();
}, [])
function handleChange(e) {
setNote(e.target.value);
}
async function handleSubmit() {
const res = await fetch(`${process.env.NEXT_PUBLIC_API_URL}/notes/`, {
method: 'POST',
headers: {
'Content-Type': 'application/json'
},
body: JSON.stringify({
text: note,
completed: false
})
})
const json = await res.json();
setNotes([...notes, json])
}
return (
<div>
<Head>
<title>Notes</title>
</Head>
<div className="container mx-auto p-10 m-10">
<div className="flex flex-col">
<h1 className="font-bold mb-3">Notes</h1>
<textarea value={note} onChange={handleChange} className="border-2" ></textarea>
<div className="mx-auto p-3 m-5">
<button onClick={handleSubmit} className="bg-green-500 p-3 text-white">Submit</button>
</div>
<div>
<ul>
// 완료 항목은 파란색으로, 미완료는 노란색으로 표시
{notes && notes.map((note) =>{
return note.completed ? (
<li key={note.id} className="bg-blue-100 m-3 p-3 border-blue-200 border-2">{note.text}</li>
) : (
<li key={note.id} className="bg-yellow-100 m-3 p-3 border-yellow-200 border-2">{note.text}</li>
)
})}
</ul>
</div>
</div>
</div>
</div>
)
}
|
3) NEXT_PUBLIC_API_URL 설정 (.env 파일)
.env.development 파일 생성- NEXT_PUBLIC_API_URL 작성
NEXT_PUBLIC_API_URL=http://localhost:8000
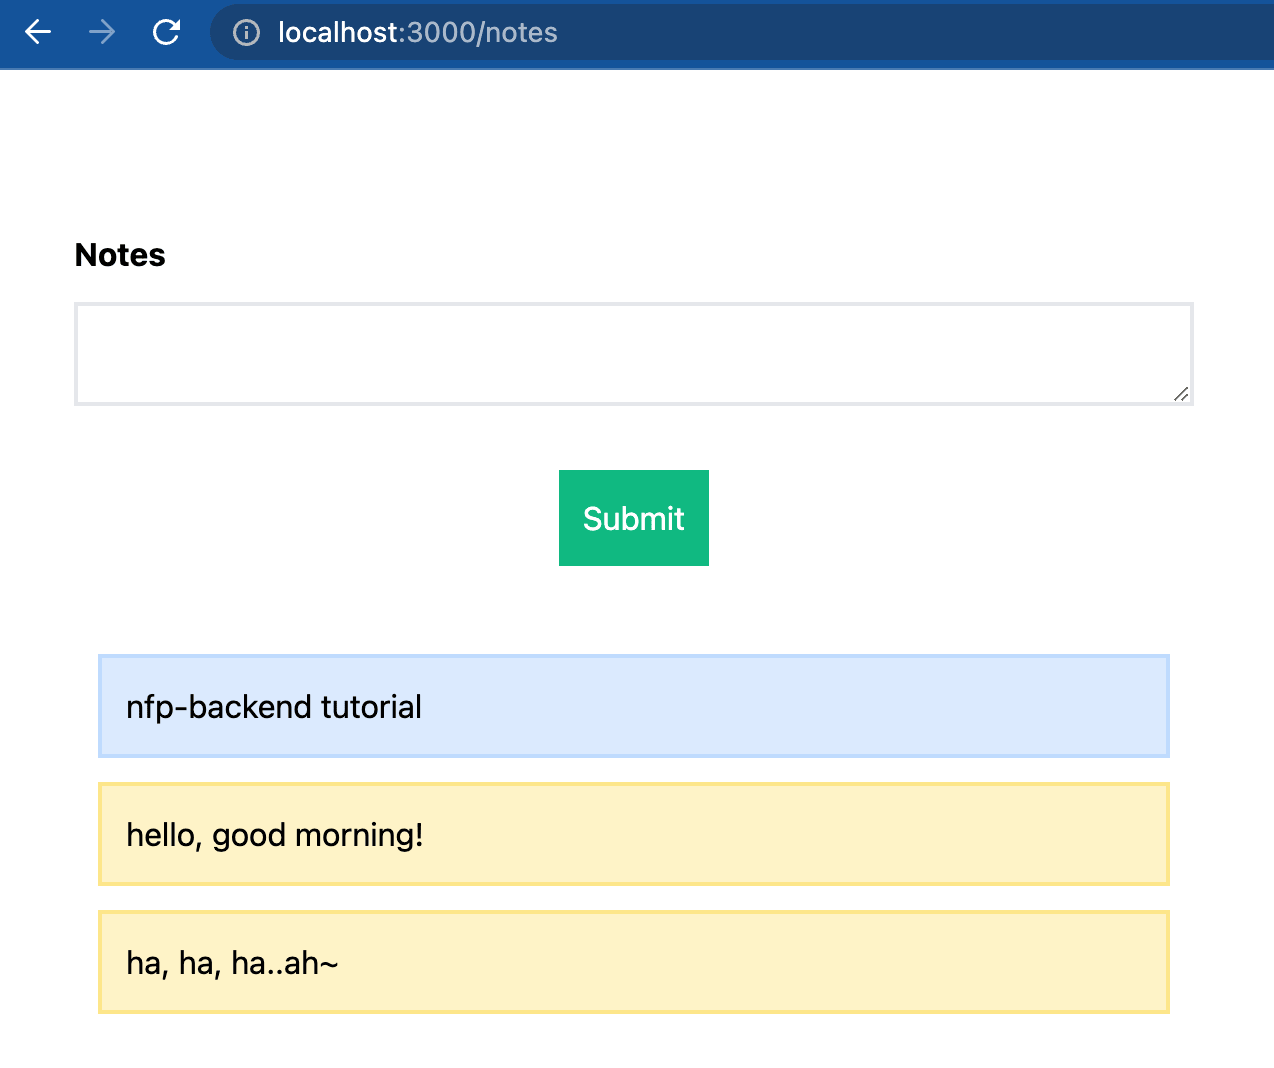
yarn dev 확인- Notes 에 아무말이나 작성 후, Submit 클릭!
- 하단에 텍스트 박스 리스트로 잘 출력되면 정상
![캡쳐 - nfp-boilerplate app]() |
|---|
| <그림> 캡쳐 - nfp-boilerplate app |
4) pm2 로 next app 실행
- pm2 설치
ecosystem.config.js 파일 작성 (아래 코드 블록 참조)
1
2
3
4
5
6
7
8
9
10
11
12
13
14
15
16
17
18
19
20
21
22
23
24
| // -------------------------------
// ecosystem.config.js
// -------------------------------
'use strict';
// for pm2
module.exports = {
apps: [
{
name: "nfp-frontend", // App 이름
script: "yarn start",
watch: true, // 파일 변경시 자동 재실행
env: { // 개발환경
"NODE_ENV": "development"
},
env_production: { // 배포환경
"NODE_ENV": "production",
"NODE_OPTIONS": "--inspect", // 브라우져 console 출력
"PORT": "3000"
}
}
]
};
|
pm2 사용하기
1
2
3
4
5
6
7
8
9
10
11
12
13
14
15
16
17
18
19
20
| $ pm2 start ecosystem.config.js --env production
[PM2][WARN] Applications nfp-frontend not running, starting...
[PM2] App [nfp-frontend] launched (1 instances)
┌────┬──────────────┬──────┬────┬─────────┬─────┬────────┐
│ id │ name │ mode │ ↺ │ status │ cpu │ memory │
├────┼──────────────┼──────┼────┼─────────┼─────┼────────┤
│ 0 │ nfp-frontend │ fork │ 0 │ online │ 0% │ 2.3mb │
└────┴──────────────┴──────┴────┴─────────┴─────┴────────┘
# 리스트
$ pm2 list
# 상세 정보 (by id)
$ pm2 show 0
# 모니터링 (by name)
$ pm2 monit nfp-frontend
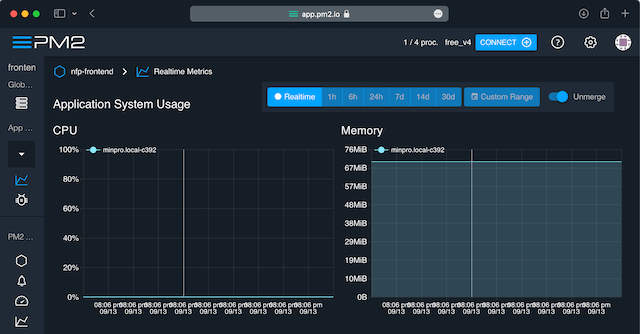
# app.pm2.io 으로 보기
$ pm2 monitor nfp-frontend
|
![pm2.io - processes overview]() |
|---|
| <그림> pm2.io - processes overview |
![pm2.io - monitor realtime]() |
|---|
| <그림> pm2.io - monitor realtime |
9. Review
- 훗날 기술부채의 고통을 겪지 않으려면 평소에 기술 트렌드를 살펴두자
- 관련 도구와 관련 기술이 다양해져서, 미리 셋업해 놓지 않으면 필요한 경우에 찾아 쓰기가 어렵다. 여러 기술을 하나의 패키지/튜토리얼로 묶어서 익혀두는게 좋다. 문서화도 잘 해놓자.
- pm2 는 모니터링 외에도 버전 교체 등을 위한 reload 기능, 클러스터 설정 등이 중요한 사용 요인이다.
- next.js 는 정적페이지 방식이지만 jekyll, gatsby 등이랑 많이 다르다. React.js 를 어느정도 숙달한 다음에 전환하는 방식이 알맞는 것 같다.
- next.js 는 실행시 반응 속도를 보면 체감상 확실히 가볍고 빠르다.
- tailwindcss 는 개발자 입장에서 다루기 좋은 css 로 알려져 있다.
- 체계적으로 구성된 클래스 이름에 기능과 규칙이 있다.
- 다양한 예제가 준비되어 있어서, 일단은 복붙으로 시작하자.
tailwindcss 참고문서


