원하는 UI 구성을 위해 유틸리티 CSS 라이브러리인 TailwindCSS 와 Flowbite 를 공부합니다. 웹프레임워크로 SveltKit 을 사용하고 bun 런타임 위에서 실행합니다.
- Svelte Component 라이브러리 - 1일차 : Steeze UI
- Svelte Component 라이브러리 - 2일차 : Flowbite Svelte
- Svelte Component 라이브러리 - 3일차 : Flowbite Blocks ✔
0. 개요
- Bun 1.0.7 + SvelteKit 1.20.4
- TailwindCSS 3.3.5
- flowbite 2.0.0 (flowbite-svelte 0.44.18)
- flowbite-typography 1.0.3
- flowbite-svelte-icons 0.4.4
- flowbite-svelte-blocks 0.5.1
- Etc
- svelte-meta-tags 3.0.4
1. 프로젝트 생성
SvelteKit 프로젝트 생성
1
2
3
4
5
6
7
8
bun create svelte@latest bun-tailwind-app
  # - Skeleton project
  # - Javascript with JSDoc

cd bun-tailwind-app
bun install

bun run dev
TailwindCSS 및 flowbite-svelte 설정
- TailwindCSS, tailwind-merge 설치
- heroicons 설치 (MIT 라이센스), fontawesome-free 설치 (무료)
- flowbite-svelte 관련 라이브러리 설치
tailwind.config.js에 flowbite 설정 추가app.postcss에 Tailwind directives 추가- 최상위
+layout.svelte에 전역 css 및 DarkMode 버튼 추가 +page.svelte에 데모 코드를 넣어 flowbite 작동 확인
1
2
3
4
5
6
7
8
9
10
11
12
13
14
15
16
17
18
19
20
21
22
23
24
25
26
27
28
29
30
31
32
33
34
35
36
37
38
39
40
41
42
43
44
45
46
47
48
49
50
51
52
53
54
55
56
57
58
59
60
61
62
63
64
65
66
67
68
69
70
71
72
73
74
75
76
77
78
79
80
81
82
83
84
85
86
87
88
89
90
91
92
93
94
95
96
97
98
99
100
101
102
103
104
105
106
107
108
109
110
111
112
113
# tailwindcss 설치
bun add -d tailwindcss postcss autoprefixer tailwind-merge
bun add -d svelte-hero-icons
bun add @fortawesome/fontawesome-free

bunx tailwindcss init -p

# flowbite-svelte 설치
bun add -d flowbite flowbite-svelte flowbite-svelte-icons
bun add -d flowbite-typography
bun add -d flowbite-svelte-blocks

cat <<EOF > tailwind.config.js
const defaultTheme = require('tailwindcss/defaultTheme');

/** @type {import('tailwindcss').Config} */
export default {
  content: [
    './src/**/*.{html,js,svelte,ts}',
    './node_modules/flowbite-svelte/**/*.{html,js,svelte,ts}',
    './node_modules/flowbite-svelte-blocks/**/*.{html,js,svelte,ts}',
  ],
  plugins: [require('flowbite/plugin'), require('flowbite-typography')],
  darkMode: 'class',
  theme: {
    fontFamily: {
      sans: ['"Noto Sans KR"', ...defaultTheme.fontFamily.sans],
      serif: ['"Noto Serif KR"', ...defaultTheme.fontFamily.serif],
      mono: ['D2Coding', ...defaultTheme.fontFamily.mono],
    },
    extend: {
      colors: {
        // flowbite-svelte
        primary: {
          50: '#FFF5F2',
          100: '#FFF1EE',
          200: '#FFE4DE',
          300: '#FFD5CC',
          400: '#FFBCAD',
          500: '#FE795D',
          600: '#EF562F',
          700: '#EB4F27',
          800: '#CC4522',
          900: '#A5371B',
        },
      },
    },
  },
};
EOF

cat <<EOF > src/app.postcss
/* fonts: Noto Color Emoji, Noto Sans KR, Noto Serif KR */
@import url('https://fonts.googleapis.com/css2?family=Noto+Color+Emoji&family=Noto+Sans+KR:wght@300;400;500;700&family=Noto+Serif+KR:wght@400;700&display=swap');
@import url("//cdn.jsdelivr.net/gh/wan2land/d2coding/d2coding-ligature-full.css");

@tailwind base;
@tailwind components;
@tailwind utilities;

@layer base {
  body {
    @apply bg-white dark:bg-gray-800;
  }
}
EOF

cat <<EOF > src/routes/+layout.svelte
<script lang="ts">
  import '@fortawesome/fontawesome-free/css/all.min.css';
  import '../app.postcss';

  import { DarkMode } from 'flowbite-svelte';
  import { SunSolid, MoonSolid } from 'flowbite-svelte-icons';
</script>

<DarkMode class="text-lg">
  <svelte:fragment slot="lightIcon">
    <SunSolid />
  </svelte:fragment>
  <svelte:fragment slot="darkIcon">
    <MoonSolid />
  </svelte:fragment>
</DarkMode>

<slot />
EOF

cat <<EOF > src/routes/+page.svelte
<script>
  import { Alert, Button, Blockquote } from 'flowbite-svelte';
  import { InfoCircleSolid } from 'flowbite-svelte-icons';

  /** @type {import('flowbite-svelte').BlockQuoteType} */
  export let size = 'lg';

  /** @type {boolean} */
  let error = false;
</script>

<div class="p-8">
  <Alert border>
    <InfoCircleSolid slot="icon" class="w-4 h-4" />
    <span class="font-medium">Info alert!</span>
    <span class="text-{error ? 'red' : 'green'}-600">
      Change a few things up and try submitting again.
    </span>
  </Alert>
  <Blockquote {size}>Flowbite is just awesome.</Blockquote>
</div>
EOF

bun run dev
2. Flowbite Blocks in Svelte
나중에 사용할 경우를 위해 찾아보려고 작성해 두긴 했는데, 왜 정리했나 싶다. 어차피 필요하면 해당 페이지 가서 동작되는 것을 보고 찾아 쓰면 된다.
Application UI 그룹 : 애플리케이션을 만들기 위한 CRUD 관련 컴포넌트
- Table
- Advanced Tables : 이전 post 에서 다루었음
- Table Headers : 검색창, 액션 버튼, 필터 드랍다운 선택
- Table Footers
- Drawers : 사이드에서 밀려 나오며 나타나는 입력 폼
- CRUD Create Drawers : 사이드 입력 폼
- CRUD Read Drawers : 읽기 전용
- CRUD Update Drawers : 수정 전용
- Faceted Search Drawers : 입력 도구 모음, 체크박스, 입력, 별점
- Forms
- CRUD Create Forms : 일반 입력 폼
- CRUD Update Forms : 수정 전용
- Modals
- CRUD Create Modals : 모달 입력 폼
- CRUD Read Modals : 읽기 전용
- CRUD Update Modals : 수정 전용
- CRUD Delete Confirm : 삭제 확인창
- CRUD Success Message : 성공 알림창
- Faceted Search Modals : 체크박스, 모달창
- Sections
- CRUD Read Sections : 읽기 전용 섹션 폼
- Side Navigations : 사이드 메뉴 폼
- Side Navigation : 사이드 메뉴 (아이콘, 제목)
- Downdown Filters : 드랍다운, 체크박스
- Dashboard Navbars : 헤더
- Dashboard Footers : 푸터 (메시지, 아이콘)
Marketing UI : 마케팅용 페이지 및 컴포넌트
- Pages
- 404 Pages, 500 Pages (서버 에러), Maintenace Pages (공사중)
- Portfolio : 아이템 출력 페이지 (제목, 설명, 링크 등)
- Pricing Tables : 가격 정책 소개 페이지
- Forms
- Contact Forms : 고객 요청사항 입력폼
- Account Recovery Forms : 계정 회복
- Login Forms : 로그인
- Register Forms : 가입
- Reset Password Forms : 패스워드 재설정
- Components
- Banners : 알림 메시지
- Headers : 상단 메뉴바
- Popups : 팝업
- Sections
- Event Schedule : 시간 및 이벤트 제목 나열 리스트
- Customer Logos : 설명과 고객 아이콘 리스트
- FAQ Sections : 질문과 답변 쌍의 그리드
- Feature Sections : 특징 목록의 그리드
- Footer Sections : 메시지, 링크 그룹, 저작권 설명 등의 하단 섹션
- Blog Sections : 블로그 요약 카드들의 그리드
- Hero Sections : Header 와 Body 로 구성된 콘텐츠
- Content Sections : (사이드) 사진과 설명 구역
- CTA(Call-To-Action) Sections : Content Section 과 버튼
- Newsletter Sections : 뉴스레터 등록 이메일 입력 섹션
- Social Proof : 사업적 달성 수치를 강조한 섹션
- Team Sections : 구성원 프로파일 카드의 그리드 (사진, 소개, 소셜)
- Testimonial : 명언, 유명인사 멘트 강조 섹션
Blog Sections
- Section : name=”blog”
- BlogHead : slots(h2, paragraph)
- BlogBodyWrapper
- ArticleWrapper : 반복 유닛 (아이템)
- ArticleHead
- ArticleBody : slots(h2, paragraph)
- ArticleAuthor : slots(author)
- ArticleWrapper : 반복 유닛 (아이템)
Login Forms
- Section : name=”login”
- Register : href (top 클릭시 이동 페이지)
- slot=”top” : 상단 타이틀
- div, form
- Label, Input : 입력 항목 (이메일, 패스워드)
- 로그인 Button
- Register : href (top 클릭시 이동 페이지)
Team Sections
- Section : name=”team”
- TeamWrapper
- TeamHeader : slots(label)
- TeamBody
- TeamItem : 반복 유닛
- 속성 : href, src, alt, name, jobTitle
- 슬롯 : social
- TeamItem : 반복 유닛
- TeamWrapper
Publisher UI : 콘텐츠 발행용 페이지와 컴포넌트
- Blog Templates : 저자 및 날짜, 제목과 본문, 하단에 코멘트
- Comments Sections : 코멘트 입력폼과 트리형 리스트
3. flowbite-svelte-blocks 사용 방법
작은 단위부터 제작되어 쌓아올린 형태라서 일부를 뜯어 사용하기가 어렵다. 예를 들어, Navbar 의 경우 메뉴 아이템 NavLi, NavUl 부터 작성되어 있어서 Navbar 를 사용하려면 일부를 수정하기 어렵다. 이에 반해, daisyUI 는 태그 생성을 줄이고 기본 태그에 스타일을 입힌 형태라 이해가 쉽다. (Bootstrap 스타일이라 그런지도)
라이브러리
flowbite 는 사전 작성된 template 의 class 를 사용자가 prop 로 변경할 수 있도록 해 두었기 때문에, twMerge 등의 함수를 사용할 필요가 있다. 그리고, flowbite-svelte-blocks 페이지에 사용된 SEO 라이브러리가 유용해 보여 기록해 둔다.
tailwind-merge : tailwindcss 클래스 병합 함수
그룹과 우선순위에 의해 클래스들을 병합하여 출력한다. (join 과 overlay)
1
2
3
4
import { twMerge } from 'tailwind-merge'

twMerge('px-2 py-1 bg-red hover:bg-dark-red', 'p-3 bg-[#B91C1C]')
// → 'hover:bg-dark-red p-3 bg-[#B91C1C]'
단순 join 할 경우 twJoin 사용
1
2
3
4
5
6
7
8
9
<script>
  import { twJoin } from 'tailwind-merge';
  let divClass = 'w-full mx-auto bg-gradient-to-r bg-white';
  let meta = {class:'dark:bg-gray-900 p-2 sm:p-6'};
</script>

<div class={twJoin(divClass, meta.class)}>
  <slot name="example" />
</div>
svelte-meta-tags
Svelte 프로젝트에 SEO 메타 태그를 제공하는 라이브러리
- 대상: FaceBook, Twitter, Open Graph, JSON-LD
- 항목: title, description, url, images 등등..
최상위
+page.svelte에 작성
1
2
3
4
5
<script>
  import { MetaTags } from 'svelte-meta-tags';
</script>

<MetaTags title="Example Title" description="Example Description." />
생성된 html 소스 (예시)
1
2
3
4
5
6
7
8
9
10
11
12
13
14
15
16
17
18
19
20
21
<head>
  <meta name="robots" content="index,follow">

  <meta name="description" content="(생략)...">

  <meta name="twitter:card" content="summary_large_image">
  <meta name="twitter:creator" content="@shinokada">
  <meta name="twitter:title" content="Flowbite-Svelte-Blocks ">
  <meta name="twitter:description" content="(생략)...">
  <meta name="twitter:image" content="https://open-graph-vercel.vercel.app/api/flowbite-svelte-blocks?title=Flowbite%20Svelte%20Blocks">

  <meta property="fb:app_id" content="672622757749720">

  <meta property="og:url" content="https://flowbite-svelte-blocks.vercel.app/">
  <meta property="og:type" content="website">
  <meta property="og:title" content="Flowbite-Svelte-Blocks ">
  <meta property="og:description" content="(생략)...">
  <meta property="og:image" content="https://open-graph-vercel.vercel.app/api/flowbite-svelte-blocks?title=Flowbite%20Svelte%20Blocks">
  <meta property="og:image:width" content="1200">
  <meta property="og:image:height" content="630">
</head>
Marketing UI - Maintenance Pages
- 템플릿 내에서 정해진 슬롯에 html 작성
- 설정 가능한 Props 에 값 작성 : 아이콘, 특정 요소에 대한 class 등..
- tailwindcss class 의 경우 default 값을 복사하여 수정
슬롯 (Slots)
- Maintenance
- slot=”h1”
- slot=”paragraph”
속성 (Props)
- Icon : typeof SvelteComponent
- h1Class
- pClass
1
2
3
4
5
6
7
8
9
10
<script>
  import { Section, Maintenance } from 'flowbite-svelte-blocks';
</script>

<Section name="maintenance">
  <Maintenance>
    <svelte:fragment slot="h1">Under Maintenance</svelte:fragment>
    <svelte:fragment slot="paragraph">Our Enterprise administrators are performing scheduled maintenance.</svelte:fragment>
  </Maintenance>
</Section>
소스 : src/lib/Maintenance.svelte
1
2
3
4
5
6
7
8
9
10
11
12
13
14
15
16
17
<script lang="ts">
  import type { SvelteComponent } from 'svelte';
  import { twMerge } from 'tailwind-merge';
  import ToolsIcon from './ToolsIcon.svelte';
  export let Icon: typeof SvelteComponent = ToolsIcon;
  export let h1Class: string = 'mb-4 text-4xl font-bold tracking-tight leading-none text-gray-900 lg:mb-6 md:text-5xl xl:text-6xl dark:text-white';
  export let pClass: string = 'font-light text-gray-500 md:text-lg xl:text-xl dark:text-gray-400';
</script>

<svelte:component this={Icon} />

{#if $$slots.h1}
  <h1 class={twMerge(h1Class, $$props.classH1)}><slot name="h1" /></h1>
{/if}
{#if $$slots.paragraph}
  <p class={twMerge(pClass, $$props.classP)}><slot name="paragraph" /></p>
{/if}
9. Review
- DaisyUI 를 이용해 Flowbite-Svelte-Blocks 같은 요소를 제작하고 싶다.
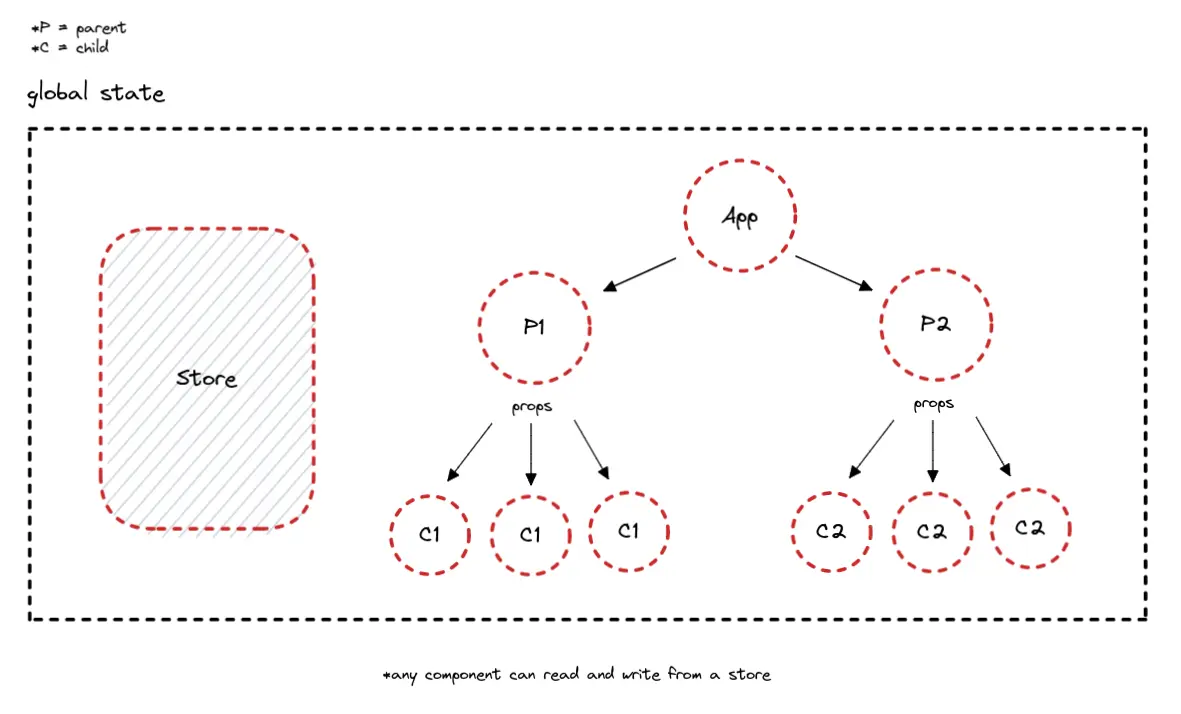
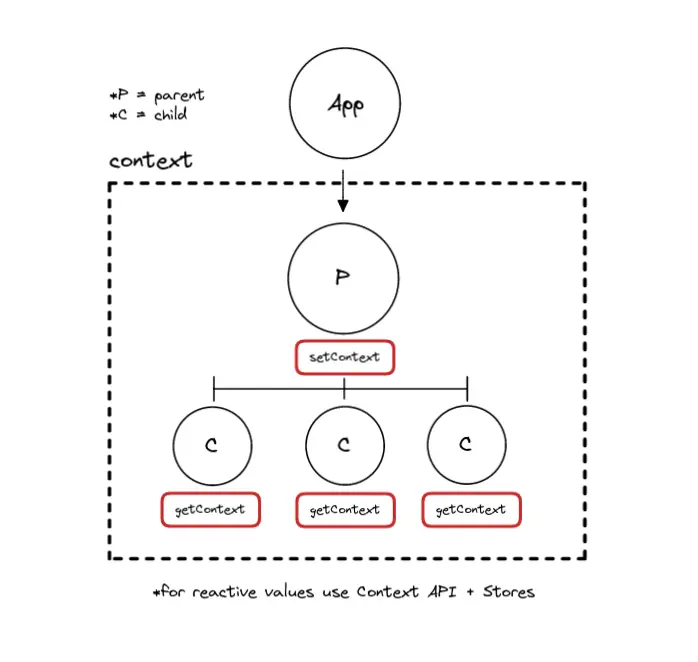
- Svelte 의 Context 와 Store 를 함께 사용하는 방법은 JoyOfCode 포스트 에 아주 잘 설명되어 있다. 특히 예제 코드가 좋다.
참고 : Svelte 에서 Context 와 Store 차이점
- Context : 구성요소 계층 내에서 상속되는 데이터 (prop drilling)
- props 를 통해 데이터를 전달하지 않고도, 모든 수준에서 접근 가능
- (reactive 가 아니라서) 변경에 대한 구독은 불가능
- ex) canvas 요소가 있다면,
canvas.getContext('2d')호출해 사용
- Store : 구독 시스템을 통해 애플리케이션 전체에서 변경 상태를 전달할 수 있다.
- (reactive 에 의해) 변경시 적절한 로직을 처리하는 방식으로 사용
- ex) 알림(notification)
- Store : 값이 변경될 때마다 알림을 받을 수 있는 객체

- Context : 공유되는 개체(element)가 있을 경우 set/get 가능
 svelte-context-diagram
store 를 상위 context 에 저장하여 하위 요소에서 공유하는 방식이 권장됨
1
2
3
4
5
6
7
8
9
10
11
12
13
14
15
16
17
18
19
20
21
22
23
24
<!-- mapbox.js -->
<script type="module">
  import { setContext } from 'svelte'
  import { writable } from 'svelte/store'

  export const key = {};  // 임의의 객체
  const value = writable(0);  // 초기값

  // the value is now reactive
  setContext('key', value)
</script>

<!-- app.js -->
<script lang="ts">
  import { getContext } from 'svelte';
  import { key } from './mapbox.js';

  const value$ = getContext(key);
  value$.subscribe((value) => {
    console.log(value);
  }); // logs '0'

  value$.set(1); // logs '1'
</script>
끝! 읽어주셔서 감사합니다.