웹서버의 기본 메카니즘을 이해하기 위해 초기 버전의 bun express 코드를 살펴보며 공부한다. Bun.serve 를 중심으로 Server, Request, Response 등에 대해서 살펴보자.
0. 출처
Express 를 Bun 런타임으로 다시 만들며, 구현 사항들을 설명한 블로그 글이 눈에 띄어 살펴보게 되었다.
기본 사용법
1
2
3
4
5
6
7
8
9
10
11
12
13
14
15
16
17
18
19
20
| // server.ts
const server = Bun.serve({
port: 8080,
fetch(req) {
const url = new URL(req.url);
if (url.pathname === "/") return new Response("Home page!");
if (url.pathname === "/blog") return new Response("Blog!");
if (url.pathname === "/file") return new Response(Bun.file("./hello.txt"));
throw new Error("404 woops!");
},
error(error) {
return new Response(`<pre>${error}</pre>`, {
headers: {
"Content-Type": "text/html",
},
});
},
});
console.log(`Listening on http://localhost:${server.port} ...`);
|
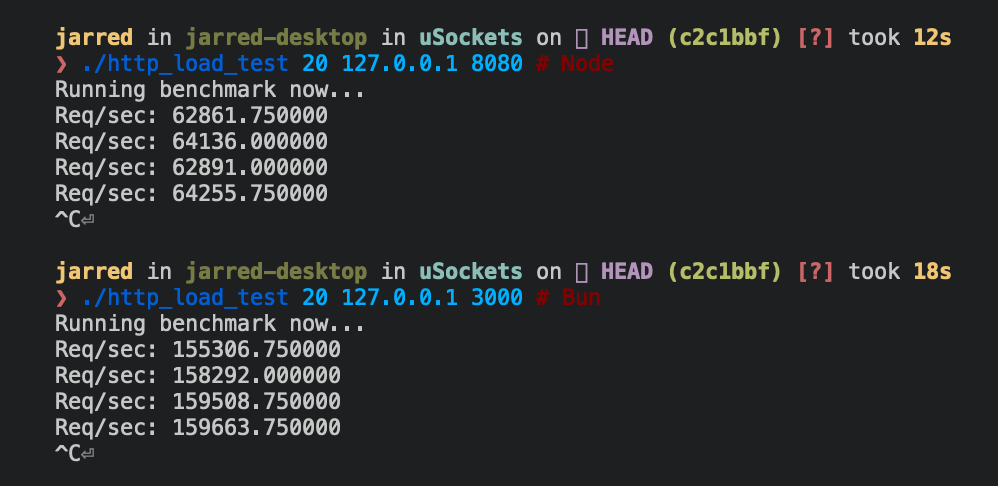
node16 vs bun benchmarks
Bun.serve(초당 15만건)가 Node 16(초당 6만건) 보다 약 2.5배 빠르다.
![node16 vs bun benchmarks]() node16 vs bun benchmarks
node16 vs bun benchmarks
BunServer 클래스
- singleton 패턴
- 생성자는 한번만 호출하고, 이후 BunServer.instance 로 접근
- requestMap :
Map<string, Handler>${method}:${path} 을 키로 사용하여 Handler 연결- method: GET, POST, PUT, …
- middlewares :
Middleware[] - errorHandlers:
Handler[]
1
2
3
4
5
6
7
8
9
10
11
12
13
14
15
16
17
18
19
20
21
22
23
24
| class BunServer implements RequestMethod {
// singleton bun server
private static server?: BunServer;
constructor() {
if (BunServer.server) {
throw new Error('DONT use this constructor to create bun server, try Server()');
}
BunServer.server = this;
}
static get instance() {
return BunServer.server ?? (BunServer.server = new BunServer());
}
private readonly requestMap: Map<string, Handler> = new Map<string, Handler>();
private readonly middlewares: Middleware[] = [];
private readonly errorHandlers: Handler[] = [];
get(path: string, ...handlers: Handler[]) {
this.delegate(path, "GET", handlers);
};
/* ... */
}
|
triple dot(...) 는 object 를 부분적으로 unwrap 할 때 쓰인다. 참고
1
2
3
4
5
6
7
8
9
10
11
12
13
14
15
| /* 예시 1 */
let data = { a:1, b:2, c:3 };
const { a, ...rest } = data;
// a = 1
// rest = { b:2, c:3 }
/* 예시 2 */
const multiplyArgs = (multiplier, ...otherArgs) => {
return otherArgs.map((number) => {
return number * multiplier;
});
};
let multipiedArray = multiplyArgs(6, 5, 7, 9);
console.log(multipiedArray); // [30,42,54]
|
openServer.fetch 함수
- bunRequest 처리를 먼저 하고 responseProxy 수행
- middlewares 를 처리 :
* 먼저 하고, path 일치하는 것들을 나중에 수행 - requestMap 으로부터 req 의 method 와 path 에 해당하는 handlers 가져오기
- 모든 handlers 처리
1
2
3
4
5
6
7
8
9
10
11
12
13
14
15
16
17
18
19
20
21
22
23
24
25
26
27
28
29
30
31
32
33
34
35
36
37
38
39
40
41
42
43
44
45
46
47
48
49
50
51
52
53
54
55
56
57
58
59
| private openServer(
port: string | number,
baseUrl: string,
options?: SSLOptions
): Server {
const that = this;
return Bun.serve({
port, /* ...options, */
async fetch(req1: Request) {
const req: BunRequest = await that.bunRequest(req1);
const res = that.responseProxy();
// middlewares handler
if (that.middlewares.length !== 0) {
const plainMid = that.middlewares.filter((mid) => mid.path === "*");
const chain = new Chain(req, res, plainMid);
chain.next();
if (res.isReady()) {
return res.getResponse();
}
if (!chain.isFinish()) {
throw new Error("Please call next() at the end of your middleware");
}
}
/* ... */
// request handler
const tree: TrieTree<string, Handler> =
that.requestMap[req.method.toLowerCase()];
if (!tree) {
throw new Error(`There is no path matches ${req.method}`);
}
const leaf = tree.get(req.path);
const handlers: Handler[] = leaf.node?.getHandlers();
// append req route params
req.params = leaf.routeParams;
// fix (issue 4: unhandle route did not throw an error)
if (!handlers || handlers.length === 0) {
throw new Error(`Cannot ${req.method} ${req.path}`);
}
// fix (issue 13) : How to make it work with async functions or Promises?
// fix where response data cannot be processed in promise block
for (let i = 0; i < handlers.length; ++i) {
const response = handlers[i].apply(that, [req, res]);
if (response instanceof Promise) {
await response;
}
}
return res.getResponse();
},
/* ... */
});
}
|
메소드 오버로딩 : 메소드의 변종들을 작성하고, 마지막에 메소드 구현부를 기술한다.
- 마지막 서명을 구현 서명(implementation signature)이라고 한다.
1
2
3
4
5
6
7
| // 같은 이름이지만 다른 입력 파라미터를 가진 메소드 (오버로딩)
methodName(params1): returnType1
methodName(params2): returnType2
methodName(params3): returnType3 // implementation signature
{
// implementation
}
|
- Products 클래스의 메소드 오버로딩 예시
- filter 함수를 사용하려면 name, price 모두가 필요하다.
- price 가 없는 filter 함수를 만들려면 어떻게 해야 하는가?
- name 으로만 된 filter 함수 선언 (오버로딩)
- name 과 price (nullable) 으로 된 filter 함수 선언
- 구현부
1
2
3
4
5
6
7
8
9
10
11
12
13
14
15
16
17
18
19
20
21
22
23
24
25
26
| class Products {
// ...
filter(name: string, price: number): Product[] {
return this.products.filter(
(product) =>
product.name === name &&
product.price === price
);
}
}
// ==> 오버로딩을 이용한 올바른 구현
//
class Products {
// ...
filter(name: string): Product[]
filter(name: string, price?: number): Product[] {
if (price === undefined) {
return this.products.filter(product => product.name === name);
} else {
return this.products.filter(
product => product.name === name && product.price === price
);
}
}
}
|
middlewares 처리 (체인 패턴)
- 미들웨어 실행함수를 배열로 만들고
- next 함수로 다음 미들웨어를 실행하고 ready 상태를 설정
- 배열의 끝이면 체인 이동 중단
1
2
3
4
5
6
7
8
9
10
11
12
13
14
15
16
17
18
19
20
21
22
23
24
25
26
27
28
29
30
31
32
| export type MiddlewareFunc = (
req: Request,
res: BunResponse,
next: (err?: Error) => {}
) => void;
export function Chain(req: Request, res: BunResponse, middlewares: Middleware[]) {
this.middlewares = middlewares.map((mid) => {
return () => {
mid.middlewareFunc(req, res, this.next);
return res.isReady();
}
}); // 함수 배열
this.index = 0; // 배열 위에서의 현재 위치
this.isReady = false;
this.next = () => {
if (this.isFinish()) {
return; // 체인 이동 중단
}
const cur = this.middlewares[this.index++];
this.isReady = cur(); // middlewareFunc 실행
if (this.isReady) {
return;
}
}
this.isFinish = () => {
return this.index === this.middlewares.length;
};
}
// const chain = new Chain(req, res, middlewares);
// chain.next();
|
function Chain(...) 은 javascript 스타일 생성자 (일반함수)
1
2
3
4
5
6
7
| // Object 를 생성하는 함수 또는 클래스는 통상 첫글자를 대문자로 표기한다.
> function Person(name, age) { this.name = name; this.age = age; }
// => [Function: Person]
> const customer1 = new Person("John", 50);
// 생성자
> customer1
// => Person { name: 'John', age: 50 }
|
익명(anonymous)함수는 그냥 함수다. 생성자가 될 수 없다. (this 를 쓸 수 없다)
1
2
3
4
5
6
7
8
9
10
11
12
| > const Customer = (name, age)=>{ this.name=name; this.age=age; }
// => [Function: Customer]
> new Customer('Calson',30)
// TypeError: function is not a constructor
> Customer('Calson',30)
1 | const Customer = (name, age)=>{
2 |
3 | (void 0).name = name;
^
TypeError: undefined is not an object
|
제너레이터 function* () 표현식
1
2
3
4
5
6
7
8
9
10
11
| const foo = function* () {
yield 'a';
yield 'b';
yield 'c';
};
let str = '';
for (const val of foo()) {
str = str + val;
}
// str => 'abc'
|
- fetch 에서 Response 의 실제 처리가 이루어지고, 여기서는 재정의 수준
1
2
3
4
5
6
7
8
9
10
11
12
13
14
15
16
17
18
19
20
21
22
23
24
25
| export class BunResponse {
private response: Response;
private options: ResponseInit = {};
status(code: number): BunResponse {
this.options.status = code;
return this;
}
json(body: any): void {
this.response = Response.json(body, this.options);
}
send(body: any): void {
this.response = new Response(body, this.options);
}
getResponse(): Response {
return this.response;
}
isReady(): boolean {
return !!this.response;
}
/* ... */
}
// const res = new BunResponse();
// res.status(200).send();
|
타입
1
2
3
4
5
6
7
8
9
10
11
12
13
14
15
16
17
18
| export type Handler = (
req: BunRequest,
res: BunResponse,
next?: (err?: Error) => {},
err?: Error
) => void | Promise<any>;
export interface BunRequest {
method: string;
request: Request;
path: string;
headers?: { [key: string]: any };
params?: { [key: string]: any };
query?: { [key: string]: any };
body?: { [key: string]: any } | string | undefined;
blob?: any;
originalUrl: string;
}
|
BunServer.bunRequest 함수
- Request 를 받아 BunRequest 로 재생성
- async 함수이므로 Promise 를 반환 (await 없음)
1
2
3
4
5
6
7
8
9
10
11
12
13
14
15
| private async bunRequest(req: Request): Promise<BunRequest> {
const { searchParams, pathname } = new URL(req.url);
const newReq: BunRequest = {
method: req.method,
path: pathname,
request: req,
query: {},
params: {},
headers: {},
originalUrl: req.url,
};
/* ... */
return newReq;
}
|
9. Review
- express 서버 메카니즘을 본다는 것이 typescript 공부가 되어 버렸다.
- 코드로부터 공부하는 것이 제일 탄탄하다.
- 이 형님은 type 제약은 최소한으로 하되, any 타입을 적극적으로 사용한다.
- 코드를 보다보니 javascript 의 아리까리 한 것들을 다시 살펴보게 되었다.
- typescript 의 method 오버로딩에 대해 살펴보았다.
 node16 vs bun benchmarks