Redis Stack 의 다양한 기능에 대해 알아봅니다. (1일차)
1. 원문 : Hello, Redis Stack - 2022년 3월 23일
 Redis Stack
1) 기본 Redis 외 지원사항
- Redis 데이터 인덱싱 및 쿼리, 집계 실행, 전체 텍스트 검색 수행
- 고급 벡터 유사성 검색(KNN) 실행
- 중첩된 JSON 문서를 효율적으로 저장 및 조작
- 속성 그래프로 관계 구축 및 모델링 (end-of-life 예정)
- 시계열 데이터 저장, 쿼리 및 집계
- 빠르고 공간적이며 컴퓨팅 효율적인 확률적 데이터 구조 활용
- RedisInsight를 사용하여 Redis 데이터를 쉽게 시각화, 디버그 및 분석
Redis Stack Packaging
- Redis Stack Server : RedisInsight 애플리케이션이 없는 버전
- Redis Stack : RedisInsight 애플리케이션이 포함된 버전
2) Redis OM 의 기능
- Redis 프로토콜(RESP 등)을 구현
- 연결 관리(TCP 등), 재연결, 서버 검색 등
- 실행 로직 관리(스레드, 비동기 io 등)
- 임의의 Redis 명령을 실행하기 위한 API 노출
- 언어 관용적 방식으로 Redis 명령 노출
- 연결 문자열을 통해 모든 Redis 배포에 연결
2. Redis Stack 설치
1) Docker 설치
설치 후 RedisInsight 열기 http://localhost:8001
1
2
3
4
5
6
7
8
9
10
11
12
13
14
15
16
17
18
19
20
21
22
23
24
$ docker pull redis/redis-stack:latest
$ docker run -d --name redis-stack -p 6379:6379 -p 8001:8001 \
  redis/redis-stack:latest

# 도커 안의 redis-cli 실행시
$ docker exec -it redis-stack redis-cli

# create volume 또는 직접 bind
$ docker volume create --name redis-data \
  --opt type=none --opt o=bind \
  --opt device=/home/bgmin/Jinna_Balu/Test_volume

$ docker stop redis-stack
$ docker rm redis-stack

# mount config files
# config 사용시 추가 => -v `pwd`/redis-stack.conf:/redis-stack.conf
$ docker run -d \
  -e REDIS_ARGS="--requirepass redis-stack --save 60 1000 --appendonly yes" \
  -v `pwd`/redis-data/:/data \
  -p 6379:6379 -p 8001:8001 \
  --name redis-stack \
  --restart always \
  redis/redis-stack:latest
AOF rewrite 를 위한
auto-aof-rewrite-min-size의 기본값은 64MB
- AOF Auto Rewrite를 Disable 하려면
auto-aof-rewrite-percentage를0으로 설정하면 된다. (기본값은 100) - 상태 조회는
info persistence명령어로 확인
requirepass설정시 로그인 방법 (패스워드)
- Redis 서버의 기본 username 은
default이다.- AUTH 명령어 사용법:
auth [username] password
- AUTH 명령어 사용법:
1
2
3
4
5
6
7
8
9
10
11
12
13
14
15
16
17
18
19
20
21
22
$ redis-cli -u redis://localhost:6379
localhost:6379> auth default redis-stack
OK
localhost:6379> acl whoami
"default"
localhost:6379> acl users
1) "default"
localhost:6379> acl getuser default
 1) "flags"
 2) 1) "on"
    2) "allkeys"
    3) "allchannels"
    4) "allcommands"
 3) "passwords"
 4) 1) "61abc586f05041f4bb6ac1eb8c049fa3dc85ee218995698c0c85c4f4ec113d18"
 5) "commands"
 6) "+@all"
 7) "keys"
 8) 1) "*"
 9) "channels"
10) 1) "*"
localhost:6379>
entrypoint.sh 에서 사용된 docker arguments
참고: Redis - Docker - Environment variables
- REDIS_ARGS
- REDISEARCH_ARGS=”MAXSEARCHRESULTS 10000 MAXAGGREGATERESULTS 10000”
- REDISTIMESERIES_ARGS
- REDISJSON_ARGS
- REDISBLOOM_ARGS
고정된 variables
- BASEDIR=/opt/redis-stack
- CMD=${BASEDIR}/bin/redis-server
- CONFFILE=/redis-stack.conf
- REDIS_DATA_DIR=/data
도커 이미지 안에 있는 /etc/redis-stack.conf 파일
- port 외에는 entrypoint.sh 에서 모두 지정된 내용임
- conf 보다 REDIS_ARGS 로 설정하는게 낫다
conf 를 작성하려면, daemonize 와 loadmodule 을 제외한 나머지를 작성할 것
1
2
3
4
5
6
7
port 6379
daemonize no
loadmodule /opt/redis-stack/lib/redisearch.so
loadmodule /opt/redis-stack/lib/redisgraph.so
loadmodule /opt/redis-stack/lib/redistimeseries.so
loadmodule /opt/redis-stack/lib/rejson.so
loadmodule /opt/redis-stack/lib/redisbloom.so
2) MacOS 설치
1
2
3
4
5
$ brew tap redis-stack/redis-stack
$ brew install --cask redis-stack

# 시작
$ redis-stack-server
- RedisInsight App 열기 ⇒
$ redisinsight
3. Node.js & Express 로 Redis API 만들기
출처 : Redis OM for Node.js
1) 시작하기
1
2
3
4
5
6
7
8
9
$ git clone git@github.com:redis-developer/express-redis-om-workshop.git
$ cd express-redis-om-workshop
$ npm install

$ cat << EOF > .env
REDIS_URL=redis://localhost:6379
EOF

$ npm start
2) Express 설정 및 Router 등록
1
2
3
4
5
6
7
8
9
10
11
12
13
14
15
16
17
18
19
20
21
22
23
24
25
import 'dotenv/config';

import express from 'express';
import swaggerUi from 'swagger-ui-express';
import YAML from 'yamljs';

/* import routers */
import { router as personRouter } from './routers/person-router.js';
import { router as searchRouter } from './routers/search-router.js';
import { router as locationRouter } from './routers/location-router.js';

/* create an express app and use JSON */
const app = new express();
app.use(express.json());

/* bring in some routers */
app.use('/person', personRouter, locationRouter);
app.use('/persons', searchRouter);

/* set up swagger in the root */
const swaggerDocument = YAML.load('api.yaml');
app.use('/', swaggerUi.serve, swaggerUi.setup(swaggerDocument));

/* start the server */
app.listen(8080);
3) redis-om 클라이언트 생성
- url 로 직접 clinet 생성하거나
- connection 생성 후 client 생성
1
2
3
4
5
6
7
8
9
10
11
12
13
14
15
16
17
import { Client } from 'redis-om';
import { createClient } from 'redis';

/* pulls the Redis URL from .env */
const url = process.env.REDIS_URL;

/* create and open the Redis OM Client */
// const client = await new Client().open(url);

/* create a connection to Redis with Node Redis */
export const connection = createClient({ url });
await connection.connect();

/* create a Client and bind it to the Node Redis connection */
const client = await new Client().use(connection);

export default client;
4) person Schema 생성
- Person Entity 생성 (테이블/도큐먼트 계층)
- person Schema 정의 (컬럼/필드 계층)
- person Repository 생성 (데이터를 다루기 위한 매퍼/인터페이스 계층)
Person:index생성
1
2
3
4
5
6
7
8
9
10
11
12
13
14
15
16
17
18
19
20
21
22
23
import { Entity, Schema } from 'redis-om';
import client from './client.js';

/* our entity */
class Person extends Entity {}

/* create a Schema for Person */
const personSchema = new Schema(Person, {
  firstName: { type: 'string' },
  lastName: { type: 'string' },
  age: { type: 'number' },
  verified: { type: 'boolean' },
  location: { type: 'point' },
  locationUpdated: { type: 'date' },
  skills: { type: 'string[]' },
  personalStatement: { type: 'text' },
});

/* use the client to create a Repository just for Persons */
export const personRepository = client.fetchRepository(personSchema);

/* create the index for Person */
await personRepository.createIndex();
5) 샘플 데이터 등록 PUT /person
- insert
{body}⇒ PUT /person - select
{:id}⇒ GET /person/:id - 나머지는 문서 참조
1
2
3
4
5
6
7
8
9
10
11
12
13
14
import { Router } from 'express';
import { personRepository } from '../om/person.js';

export const router = Router();

router.put('/', async (req, res) => {
  const person = await personRepository.createAndSave(req.body);
  res.send(person);
});

router.get('/:id', async (req, res) => {
  const person = await personRepository.fetch(req.params.id);
  res.send(person);
});
쉘스크립트로 샘플 데이터 넣기
1
2
3
4
5
6
7
8
9
10
$ cd persons
$ cat ./load-data.sh
for f in *.json
do
  curl -X PUT -H "Content-Type: application/json" -d "@$f" localhost:8080/person
  echo " <- $f"
done

# 모든 json 파일을 읽어서 person
$ sh ./load-data.sh
Redis Insight v2 브라우저로 Person 데이터 확인
브라우저 열기 http://localhost:8001/redis-stack/browser
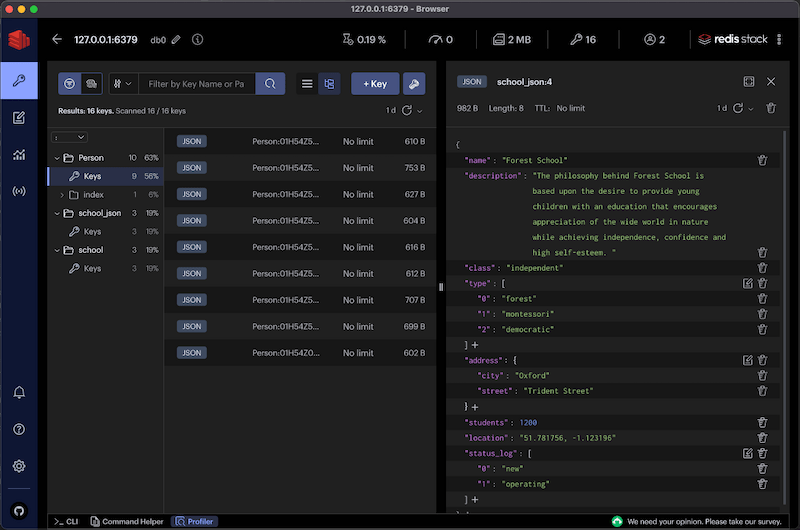 Redis Insight - Browser - Person
6) 데이터 검색 GET /persons
- all : search()
- 조건 검색 : search().where(필드)
- full-text search : search().where(필드).matchs(text)
- 그 외 위도, 경도를 이용한 거리함수로 geo 검색도 가능
- 나머지는 문서 참조
1
2
3
4
5
6
7
8
9
10
11
12
13
14
15
16
17
18
19
20
21
22
23
import { Router } from 'express';
import { personRepository } from '../om/person.js';

export const router = Router();

router.get('/all', async (req, res) => {
  const persons = await personRepository.search().return.all();
  res.send(persons);
});

// lastName 검색
router.get('/by-last-name/:lastName', async (req, res) => {
  const lastName = req.params.lastName;
  const persons = await personRepository.search().where('lastName').equals(lastName).return.all();
  res.send(persons);
});

// full-text 검색
router.get('/with-statement-containing/:text', async (req, res) => {
  const text = req.params.text;
  const persons = await personRepository.search().where('personalStatement').matches(text).return.all();
  res.send(persons);
});
7) Pub/Sub GET /channel
redis-cli 에서 subscribe/publish 테스트
1
2
3
4
5
6
7
8
9
10
# 수신자
$ rdcli -h minubt -p 6379
minubt:6379> subscribe article
article
Hello        <== 수신된 메시지

# 송신자
$ rdcli -h minubt -p 6379
minubt:6379> publish article "Hello"
(integer) 1
수신자 subscriber
- connection 을 복사해서 새로 connect 수행
- 메시지 채널명:
article로 설정 - 수신된 메시지를 console.log 로 출력
1
2
3
4
5
6
7
8
9
10
11
12
13
// ...

/* create a connection to Redis with Node Redis */
export const connection = createClient({ url });
await connection.connect();

const subscriber = connection.duplicate();
await subscriber.connect();
await subscriber.subscribe('article', (message) => {
  console.log('received:', message); // 'message'
});

// ...
송신자 publisher
- connection 을 복사해서 새로 connect 수행
- 메시지 채널
article로 text 전달 - 전송한 text 와 상태를 출력
1
2
3
4
5
6
7
8
9
10
11
12
13
14
15
import { connection } from '../om/client.js';

router.get('/pub/:text', async (req, res) => {
  const text = req.params.text;

  const publisher = connection.duplicate();
  await publisher.connect();
  const status = await publisher.publish('article', text);
  await publisher.disconnect();

  res.send({
    status: Boolean(status),
    msg: text,
  });
});
채널로 전달된 메시지는 모든 수신자에서 동일하게 출력된다.
9. Review
appendonly yes설정을 하면 서버를 재시작 해도 상태 유지가 된다.- Redis Stack 이거 하나로 인메모리와 검색, 채널 알림 처리가 가능하다.
- 모바일 서비스를 위한 백엔드 스토리지로 사용하면 좋다.
- 장바구니 등 (상대적으로 느린) 데이터베이스 이용전 상태 변경에 사용하면 좋다.
- 필수적인 또는 최종 상태만 데이터베이스를 이용한다 (성능 개선)
끝! 읽어주셔서 감사합니다.