프론트엔드 개발을 배우기 위해 CSS 기초부터 다지려고 합니다. Dave Gray 유튜브 강좌이고, 실습 환경은 SvelteKit + PostCSS 을 사용합니다. (3일차)
- Frontend 공부하기 - 1일차 : Dave Gray – HTML Full Course
- Frontend 공부하기 - 2일차 : Dave Gray – CSS Full Course Part♯1
- Frontend 공부하기 - 3일차 : Dave Gray – CSS Full Course Part♯2 ✔
- Frontend 공부하기 - 4일차 : Dave Gray – CSS Full Course Part♯3
- Frontend 공부하기 - 5일차 : Dave Gray – CSS Full Course Part♯4
참고문서
Part ♯2 Chapter 11 ~ 18
Ch11. CSS Floats and Clears
- float 는 block 내에서 위치를 지정하는 방법으로 사용됨
- 예전에는
clear: both사용해 float 배치를 무효화 했지만
- 예전에는
- section 안의 float 개체가 빠져나가지 않도록 포함하려면
overflow: auto를 하거나display: flow-root를 해야함 (← 이쪽이 더 현대적인 방법)
1
2
3
4
5
6
7
8
9
10
11
12
13
14
15
16
17
18
19
20
21
22
23
24
25
26
27
28
29
  .block {
    width: 30vw;
    height: 30vh;
    background-color: black;
    color: white;
    padding: 1rem;
  }

  .left {
    float: left;
    margin-right: 1rem;
  }

  .right {
    float: right;
    margin-left: 1rem;
  }

  .clear {
    clear: both;
  }

  section {
    background-color: bisque;
    border: 1px solid #333;
    padding: 1rem;
    /* overflow: auto; /* 이게 없으면, float 된 요소가 빠져나감 */
    display: flow-root; /* 이쪽이 더 현대적인 방법 */
  }
Ch12. CSS Columns
열 기준으로 단을 나눠서 렌더링 한다.
break-inside: avoid;블록의 짜투리가 다음 열로 넘어가지 않도록 한다white-space: nowrap;wrapping 될 때 공백으로 짤리지 않도록 한다
1
2
3
4
5
6
7
8
9
10
11
12
13
14
15
16
17
18
19
20
21
22
23
24
25
26
27
28
29
30
31
  .columns {
    columns: 4 240px;
    column-rule: 3px solid #333;  /* 분리선 */
    column-gap: 3rem; /* 열간격 */
    break-inside: avoid;  /* 밀림 방지 */

    p {
      margin-top: 0;
    }

    h2 {
      margin-top: 0;
      background-color: #333;
      color: whitesmoke;
      padding: 1rem;
      margin-bottom: 1rem;
    }

    .quote {. /* 중간 제목, 인용구 같은 스타일 */
      margin-top: 2rem;
      font-style: italic;
      font-size: 3rem;
      text-align: center;
      color: #333;
      column-span: all;  /* 모든 열을 관통 */
    }

    .nowrap {
      white-space: nowrap; /* 짤리지 않게 해준다 */
    }
  }
Ch13. CSS Position Property
position
- static: 기본값이고, 문서의 흐름을 그대로 따른다 (원래 위치)
부모 기준
- absolute: position 이 설정된 가까운 부모가 기준 (없으면 최상위)
- relative: 무조건 부모가 기준점
위치 기준
- sticky: (고정) 라인 전체 너비를 설정, footer(메뉴) 에 사용
- 스크롤시 문서 흐름대로 따른다 (밀리면 밀려 내려가거나 올라간다)
- 그래서 최상단 또는 최하단에서 써야 함
- fixed: (고정) 콘텐츠 길이만큼 너비를 설정, social(버튼) 에 사용
- 모든 흐름에서 이탈 (static 의 반대), 위치값대로 고정됨
위치 관련 설정
- z-index: 중첩시 우선순위
- left: 안보여도 존재해야 할 경우 마이너스(-) 값으로 화면에서 치운다
1
2
3
4
5
6
7
8
9
10
11
12
13
14
15
16
17
18
19
20
21
22
23
24
25
26
27
28
29
30
31
32
33
34
35
36
37
38
39
40
41
42
43
44
45
46
  .absolute {
    position: absolute; /* 기준점: 가까운 position 요소 */
    top: 100px;
    left: 50px; /* 안보여도 사용되어야 할 때, left: -9999px; */
    z-index: 1;
  }

  .relative {
    position: relative; /* 기준점: 부모 */
    top: 100px;
    left: 100px;
  }

  .fixed {
    position: fixed; /* 기준점: viewport (스크롤에도 위치 고정) */
    top: 100px;
  }

  .sticky {
    position: sticky; /* 기준점: 가까운 position 요소 */
    top: 100px;
  }

  /* ///////////////////////////////// */

  section {
    height: 100vh;
  }

  header {
    position: sticky;
    top: 0;
  }

  footer {
    /* position: fixed;  /* 너비가 콘텐츠 길이만큼만 설정됨 */
    position: sticky; /* 라인 전체 너비로 설정됨 */
    bottom: 0;
  }

  .social {
    position: fixed;
    top: 30%;
    left: 0;
    z-index: 1;
  }
세로축 중간 정렬 5가지 방법
참고: 5 Different Ways To Vertically Align Your CSS Content
- 방법1: table cell + vertical-align
- 방법2: absolute position + top
- 방법3: flex + align & justify
- 방법4: grid + align & justify (= place)
- 방법5: flex ¦ grid + margin
1
2
3
4
5
6
7
8
9
10
11
12
13
14
15
16
17
18
19
20
21
22
23
24
25
26
27
28
29
30
31
32
33
34
35
36
37
38
39
40
41
42
43
44
45
46
47

  /* 방법1: table 이용한 중간 정렬 */
  .container-center {
    display: table;
  }

  .container-center div {
    display: table-cell;
    vertical-align: middle; /* display: table, table-cell */
  }

  /* 방법2: absolute position 이용한 중간 정렬 */
  .container-center {
    position: relative;
  }

  .container-center div {
    positioin: absolute;
    width: 100%;
    top: 50%;
    /* transform: translateY(-50%); */
  }

  /* 방법3: flex 이용한 중간 정렬 */
  .container-center {
    display: flex;
    align-items: center; /* (반대축)수직 정렬 */
    justify-content: center; /* (주축)수평 정렬 */
  }

  /* 방법4: grid 이용한 중간 정렬 */
  .container-center {
    display: grid;
    place-items: center;  /* align-items & justify-content 와 같다 */
    /* align-items: center; justify-content: center; */
  }

  /* 방법5: flex|grid & margin 이용한 방법 */
  .container-center {
    /* display: flex;  또는 */
    display: grid;
  }

  .container-center div {
    margin: auto;
  }
}
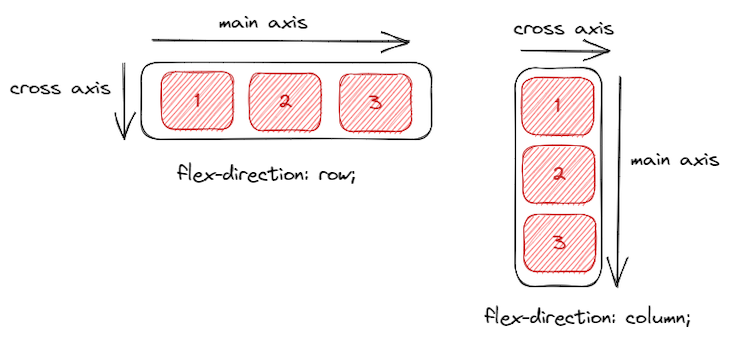
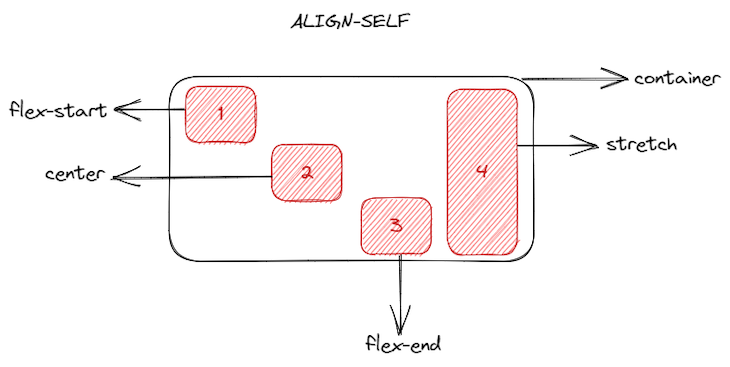
Ch14. CSS Flexbox
 flex-direction-aligning-rows-columns
주축과 교차축이라는 개념을 명심할 것
- 정렬: justify-content, align-items (align-self), align-content
- 방향: flex-direction, flow=flow
- 수축/확장: flex-grow, flex-shrink, flex-basic
 flex-wrap-visualization
1
2
3
4
5
6
7
8
9
10
11
12
13
14
15
16
17
18
19
20
21
22
23
24
25
26
27
28
29
30
31
32
33
34
35
36
37
38
 .container {
    display: flex; /* (주축: 수평) 열 방향으로 정렬 */
    gap: 1rem;

    justify-content: space-between; /* 주축 방향 정렬 */
    align-items: center; /* 교차축 방향 정렬 */
    align-content: space-evenly;

    flex-direction: column; /* (주축) 행 방향으로 전환 */
    /* flex-direction: row; /* (주축) 열 방향 전환
    flex-wrap: wrap; /* (교차축) 행 방향으로 전환 */
    flex-flow: row wrap; /* (주축) 행 방향으로 전환 */
  }

  .box {
    /* min-width: 100px; */
    height: 100px;
    background-color: #000;
    color: #fff;
    font-size: 2rem;
    padding: 0.5rem;

    display: flex;
    justify-content: center;
    align-items: center;

    /* flex-grow: 1; */
    /* flex-shrink: 1;
    flex-basis: 250px; or 40% */
    flex: 1 1 140px; /* grow, shrink, basis */

    &:nth-child(2) {
      /* flex-grow: 2; /* 2배로 넓어짐 */
      /* flex-shrink: 2; /* 2배로 줄어듦 */
      flex: 2 2 140px;
      order: -1;
    }
  }
참고: flex 개구리 게임
- 몇 개의 행 또는 열로 구현할 작은 레이아웃 디자인이 있을 때 이상적
- 요소 정렬: display: flex
- 콘텐츠가 어떻게 보일지 정확히 모르는 경우: 콘텐츠 우선 디자인에 적합
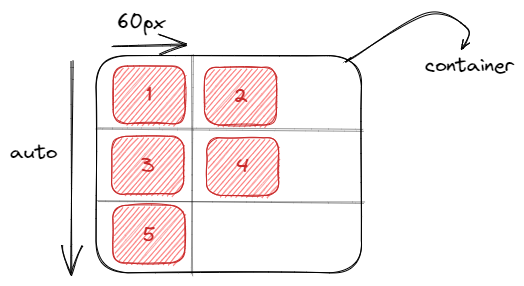
Ch15. CSS Grid Intro and Basic Layout

참고: CSS 그리드를 사용하는 경우
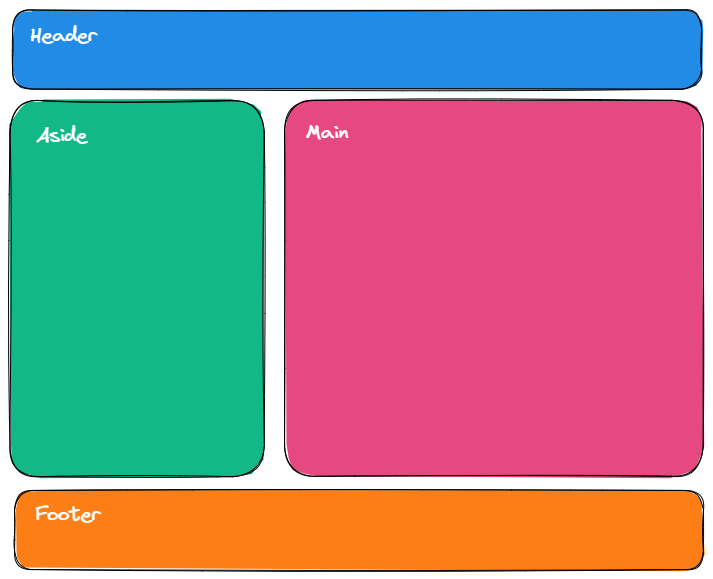
- 구현해야 할 복잡한 디자인이 있는 경우: 2차원 레이아웃 시스템 사용
- 블록 요소 사이에 간격이 있어야 하는 경우
- 요소를 중첩해야 할 때: grid-column, grid-row
- 레이아웃 우선 디자인이 필요한 경우
→ CSS Grid 로 레이아웃을 잡고, 그 안의 작은 콘텐츠들은 Flexbox 로 정렬

Ch16. CSS Background Images and Responsive Image Properties
img 하단 공백 제거 (전체 설정)
1
2
3
img {
  display: block;  /* 기본은 inline 이라 공백 생김 (텍스트와 함께 배치) */
}
클래스 구분하기
- utility classes : 특수한 속성 부여
- layout classes : 레이아웃 설정
- component classes : 특정 컴포넌트 스타일링
블로그 profile 이미지, title, 배경 이미지
- container 에 배경 이미지를 넣고
- title 설정:
nowrap - profile 이미지 설정
figure(캡션은 가리고)
1
2
3
4
5
6
7
8
9
10
11
12
13
14
15
16
17
18
19
20
21
22
23
24
25
26
27
28
29
30
31
32
33
34
35
36
37
38
39
40
41
42
43
44
45
46
47
48
49
50
51
52
53
54
55
56
57
58
59
60
61
62
63
64
65
66
67
68
69
70
<div class="container">
  <section class="hero">
    <figure class="profile-pic-figure">
      <img
        src="/images/profile-800x800.png"
        alt="Profile Picture"
        title="My Profile Picture"
        width="800"
        height="800"
      />
      <figcaption class="offscreen">Jane Doe</figcaption>
    </figure>
    <h1 class="h1">
      <span class="nowrap">Hello 👏</span>
      <span class="nowrap">I'm Jane</span>
    </h1>
  </section>
</div>

<style lang="postcss">
  /* Utility classes */
  .nowrap {
    white-space: nowrap;
  }

  .offscreen {
    position: absolute;
    left: -10000px;
  }

  /* Layout classes */
  .container {
    background-color: rgb(251, 210, 156);
    background-image: url('/images/scenic-2200x1331.png');
    background-repeat: no-repeat;
    background-position: top right;
    background-size: cover;
  }

  /* Component classes */
  .hero {
    border-bottom: 2px solid black;
    padding: 20px;
    display: flex;
    justify-content: flex-start;
    align-items: center;
    gap: 30px;
  }

  .h1 {
    font-size: 500%;
    color: aliceblue;
    text-shadow: 2px 2px 2px black;
    /* background-color: hsla(0, 0%, 0%, 0.405);
    padding: 0.25rem;
    border-radius: 10px; */
  }

  .profile-pic-figure {
    width: 35%;

    img {
      width: 100%;
      height: auto;
      min-width: 100px;
      border: 5px double gray;
      border-radius: 50%;
    }
  }
</style>
그라디언트 배경에 물방울 배경 이미지 합쳐서 꾸미기
- 배경 이미지 배치
- 배경 그라디언트 설정
linear-gradient
1
2
3
4
5
6
7
8
9
10
11
12
13
14
<section>
  <p class="clip">Jane</p>
</section>

<style lang="postcss">
  body {
    min-height: 100vh;

    background-image: url('/images/bubbles.png'), linear-gradient(to left, steelblue, white);
    background-repeat: repeat-y, no-repeat;
    background-position: right, center;
    background-size: 20%, auto;
  }
</style>
투명한 글자 뒤로 배경 이미지 배치하기
- 배경 이미지를 설정
- 투명 텍스트를 배경과 clip 시키기 (붙여서 고정시키기)
1
2
3
4
5
6
7
8
9
10
11
12
13
14
15
16
17
<section>
  <p class="clip">Jane</p>
</section>

<style lang="postcss">
  .clip {
    font-weight: 800;
    font-size: 18rem;
    text-align: center;
    background-image: url('/images/scenic-2200x1331.png');
    background-size: 100%;
    text-transform: uppercase;
    -webkit-background-clip: text;
    background-clip: text;
    color: transparent;
  }
</style>
Ch17. CSS Media Queries & Responsive Image Properties
예제: flexible layout - 너비 따라 flex 방향 변경
1
2
3
4
5
6
<html lang="en">
  <head>
    <meta name="viewport" content="width=device-width, initial-scale=1.0" />
    <link rel="stylesheet" media="screen and (min-width: 900px)" href="widescreen.css">
    <link rel="stylesheet" media="screen and (max-width: 600px)" href="smallscreen.css">
    <!-- ... -->
1
2
3
4
5
6
7
8
9
10
11
12
13
14
15
16
17
18
19
20
21
22
/* Media Query 문법 */
@media not|only mediatype and (mediafeature and|or|not mediafeature) {
  /* CSS Rules */
}

div {
  min-height: 100vh;

  background-color: #475569;
  background-image: radial-gradient(circle, whitesmoke, #475569);
  display: flex;
  flex-direction: column;
}

/* Media Query 예제 */
@media screen and (min-width: 576px) {
  div { ... }
  nav { display: none; } /* 너비가 커지면 nav 숨기기 */
}
@media screen and (min-aspect-ratio: 16/9) { div { ... } }
@media screen and (orientation: landscape) { div { ... } }
@media screen and (max-height: 425px) and (min-aspect-ratio: 7/4) { }
Media Query breakpoints
Common breakpoints:
| Breakpoint | Description |
|---|---|
| < 481px | Mobile devices |
| 481px—768px | iPads, Tablets |
| 769px—1024px | Small screens, laptops |
| 1025px—1200px | Desktops, large screens |
| 1201px and greater | Extra large screens, TV |
Bootstrap breakpoints:
| Breakpoint | Description |
|---|---|
| < 576px | xs |
| >=576px | small |
| >=768px | medium |
| >=992px | large |
| >=1200px | xl |
| >=1400px | 2xl |
Tailwind breakpoints:
| Breakpoint | Description |
|---|---|
| < 640px | xs |
| >=640px | small |
| >=768px | medium |
| >=1024px | large |
| >=1280px | xl |
| >=1536px | 2xl |
Ch18. CSS Responsive Card Design
Ch17 의 미니 프로젝트로 profile card 를 만들어 본다. (미디어쿼리 사용)
1
2
3
4
5
6
7
8
9
10
11
12
13
14
15
16
17
18
  /* || SMALL */
  @media screen and (min-width: 576px) {
    main {
      justify-content: center;
      flex-flow: row wrap;
      padding: 1rem;
    }
    .card {
      width: min(100%, 400px); /* 최대 400px (화면에 들어갈 수 있도록) */
    }
  }

  /* || XL  */
  @media screen and (min-width: 1200px) {
    .card {
      width: min(calc(100% / 3 - 1rem), 500px);
    }
  }
9. Review
- global 설정이 필요하다 :
*,img,body - classes 들을 분류하자 : 유틸리티, 레이아웃, 컴포넌트
- CSS Grid 는 레이아웃용 (2차원), Flexbox 는 정렬용 (1차원)
- 미디어 쿼리는 반응형 기술의 핵심 (ex: 뷰포트 너비)
끝! 읽어주셔서 감사합니다.