Visual Studio Code 개발 컨테이너 확장 기능을 사용하는 방법을 공부합니다. Docker 컨테이너 기반 개발 환경은 여러 개발자가 동일한 환경에서 개발할 수 있도록 합니다.
1. Dev Container
참고문서
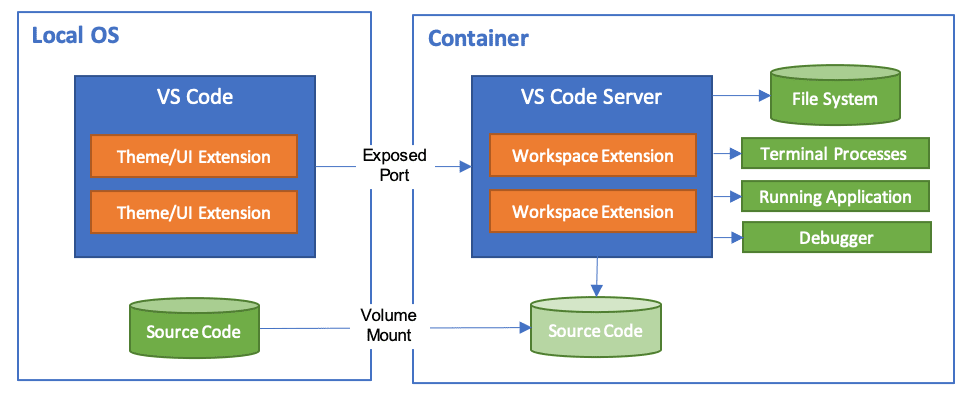
1) 아키텍처
 dev-container architecture
실제 vscode 서버는 Docker 컨테이너에서 실행되고, 사용자의 vscode 는 UI 도구로서 연결되어 원격 서버를 자신의 개발 환경처럼 사용할 수 있습니다.
2) 설정 파일: .devcontainer/devcontainer.json
- docker 컨테이너의 이미지를 설정하고
- 도커 실행시 환경변수를 설정
- 추가적인 기능을 설정하거나 (도커 이미지에 포함되는건 아니고)
- 컨테이너 생성 후 실행될 명령어를 설정
- vscode server 의 확장 기능을 설정 (로컬 vscode 에 연결된다)
- 리모트 유저
1
2
3
4
5
6
7
8
9
10
11
12
13
14
15
16
17
18
19
20
21
22
23
{
"name": "Node.js & TypeScript",

// "image": "mcr.microsoft.com/devcontainers/typescript-node:1-18-bullseye",
"build": {
  "dockerfile": "Dockerfile"
},
"containerEnv": {
  "PORT": "3000"
},

"features": {
  "ghcr.io/devcontainers-contrib/features/pnpm:2": {},
},
"postCreateCommand": "pnpm install",
"customizations": {
  "vscode": {
    "extensions": ["wholroyd.jinja"]
  }
},

"remoteUser": "node"
}
devcontainers 이미지
vscode 에서 제공하는 image 를 바탕으로 docker container 를 생성할 수 있다. 또는 직접 Dockerfile, docker-compose 를 정의하여 사용할 수도 있다.
- vscode docker image 는 vscode 명령어 팔레트에서 선택할 수 있고
- Dockerfile 과 docker-compose 는 build 태그로 정의한다.
features
Available Dev Container Features 에서 설치할 기능들을 살펴보면 된다.
Env. Variables
- containerEnv 에서 정의하거나 (도커 실행시 전달하는 방식과 같다)
- 내부
.env파일에서 정의하거나
remoteUser
보안을 위해 root 를 대신해 sudo 사용자 계정을 설정할 수 있다.
- Dockerfile 사용시에는 별도로 sudo user 생성 스크립트를 작성해야 함
- Dockerfile 의
USER <사용자계정>명령과 같다
1
2
3
4
5
6
7
8
9
10
11
12
FROM node:18-bookworm-slim

# Install basic development tools
RUN apt update && apt install -y less man-db sudo curl

# Ensure default `node` user has access to `sudo`
ARG USERNAME=node
RUN echo $USERNAME ALL=\(root\) NOPASSWD:ALL > /etc/sudoers.d/$USERNAME \
    && chmod 0440 /etc/sudoers.d/$USERNAME

# Set `DEVCONTAINER` environment variable to help with orientation
ENV DEVCONTAINER=true
3) 환경 설치
- VSCode 확장 기능: Dev Containers, Remote SSH
- Docker 서비스 (local 또는 remote)
- 원격 서버의 Docker 사용시 ssh 연결
2. nodejs 튜토리얼
0) 프로젝트 디렉토리 open
프로젝트 파일이 생성될 위치를 vscode 로 열고 아래 사항을 진행
1) dev container 생성
vscode 명령어 팔레트에서 dev container 명령어 실행
Dev Containers: Add Dev Container Configuration Files...- Base Image 선택:
Node Dev Containers: Reopen in Container
이후 .devcontainer/devcontainer.json 의 내용을 수정하여 설정
2) node 프로젝트 개발 (typescript)
vscode 의 terminal 을 열고, node --version 확인
1
2
3
4
5
6
7
8
9
10
11
12
$ npm init --yes
$ npm install express dotenv --save

$ npm i -D typescript @types/express @types/node
$ npx tsc --init

# tsconfig.json 파일에 outDir 추가
{
  "compilerOptions": {
    "outDir": "./dist"
  }
}
index.ts 작성
1
2
3
4
5
6
7
8
9
10
11
12
13
14
15
import express, { Express, Request, Response } from 'express';
import dotenv from 'dotenv';

dotenv.config();

const app: Express = express();
const port = process.env.PORT;

app.get('/', (req: Request, res: Response) => {
  res.send('Express + TypeScript Server');
});

app.listen(port, () => {
  console.log(`⚡️[server]: Server is running at http://localhost:${port}`);
});
3) Node 프로젝트 실행
node 변경 감시 및 실행 도구 설치
1
$ npm install -D concurrently nodemon
package.json 수정
1
2
3
4
5
6
7
{
  "scripts": {
    "build": "npx tsc",
    "start": "node dist/index.js",
    "dev": "concurrently \"npx tsc --watch\" \"nodemon -q dist/index.js\""
  }
}
실행
1
$ npm run dev
4) dev container 중지 및 삭제
- vscode 의 확장기능
원격 탐색기의 개발 컨테이너에서 팝업 메뉴로 선택 - 또는, Docker 명령어로 직접 실행
3. python 튜토리얼
2장과 유사한 내용이라 생략!
9. Review
- 도커 이미지 선택시 최신 데미안(릴리즈 12) 을 담은 bookworm 를 사용하자
- 기왕이면 bookworm 의 slim 버전을 사용하자
- 도커와 vscode 가 한몸처럼 붙어서 개발한다는 측면에서 편리하다.
- git push 후 원격 서버가서 git pull 하고 다시 build 하는 작업이 해결됨
끝! 읽어주셔서 감사합니다.